How to Keep Insulin Cold for Multiple Days: Step‑by‑Step Multi‑Day Cold Chain Solutions for Travel and Emergencies
Introduction
Managing temperature‑sensitive medication while traveling or during an emergency requires a reliable cold‑chain plan. This guide will teach the reader how to maintain insulin within the recommended temperature range for multiple days, how to select appropriate tools, and how to avoid common pitfalls. By following the outlined steps, one can travel with confidence, knowing that insulin will remain effective throughout the journey.
The information presented is based on real‑world product performance, user feedback, and best practices from the diabetes community. While the guide references specific tools, the principles can be applied with any comparable equipment.
What You'll Need
- Reusable ice packs (gel or frozen packs) – at least four for redundancy.
- A high‑performance insulated cooler case designed for medication.
- Temperature monitoring device (optional but recommended).
- Secure travel bag or backpack to conceal the cooler.
- Documentation for TSA screening, such as a medical letter.
All of the recommended cooler cases are available on Amazon and include the necessary ice packs.
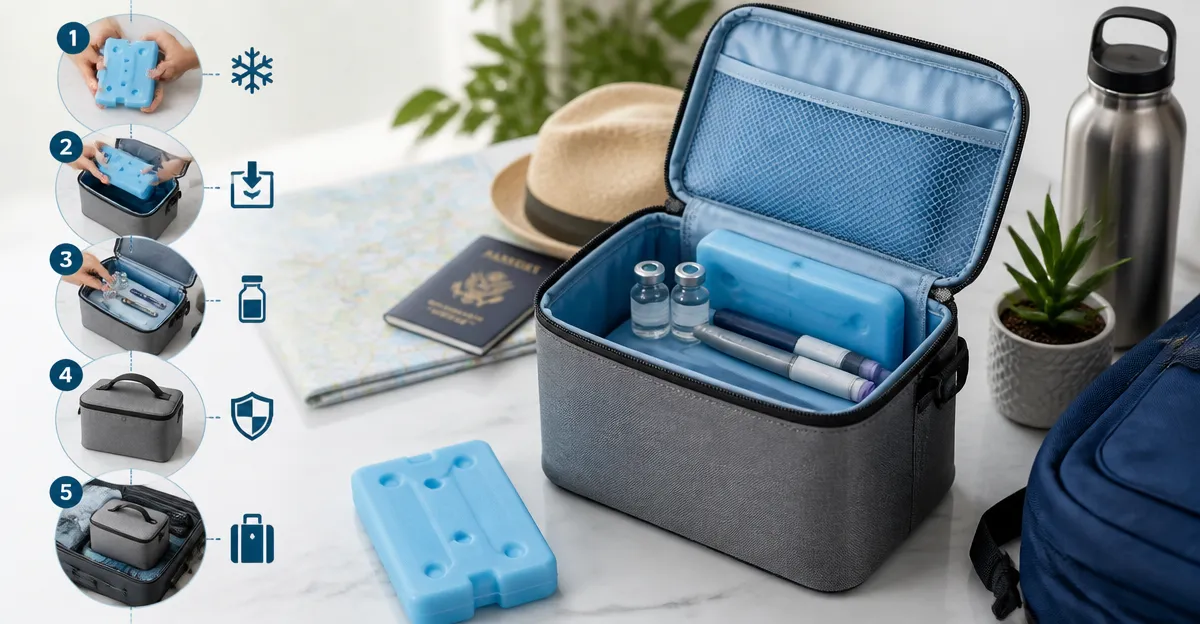
Step 1: Prepare and Freeze Ice Packs
The foundation of any multi‑day cold chain is a set of well‑frozen packs. Place the packs in a freezer at –20°C (–4°F) for at least 12 hours. For longer trips, freeze two packs a day before departure to ensure they are at peak chill when needed. The gel composition of the packs prevents leakage and maintains a stable temperature profile.
Both the ALLCAMP Insulin Travel Cooler Case and the AUVON Large Insulin Cooler Case include four reusable, latex‑free ice packs each. The ALLCAMP packs are SGS‑approved and non‑toxic, while the AUVON packs weigh 160 g each and provide up to 12 hours of cooling after a 12‑hour freeze.
Why this matters: Consistently frozen packs create a thermal buffer that slows heat transfer, extending the safe window for insulin storage.
Step 2: Choose the Appropriate Insulin Cooler Case
Select a cooler that matches the travel duration, volume of medication, and mode of transport. For short trips (1‑3 days) and limited space, the ALLCAMP Insulin Travel Cooler Case offers a compact footprint (9 × 4.72 × 3.14 in) and a lightweight design (1.4 lb). Its multi‑layer insulation (600D Oxford, cotton, aluminum foil) provides superior temperature regulation, and the dual zipper ensures a secure seal.
For longer journeys or when carrying multiple pens, the AUVON Large Insulin Cooler Case offers a larger interior (8.5 × 6.1 × 3.3 in) and triple compartments that can hold up to eight pens. The patented 3‑layer design (Oxford exterior, EPE foam, aluminum interior) combined with four 160 g ice packs extends cooling to 10‑12 hours at 25‑30 °C.
For extreme temperature control, the AUVON Vacuum Insulin Cooler Case utilizes stainless‑steel vacuum insulation and a 220 g gel pack that can maintain 36‑86 °F for up to 53 hours when fully frozen. This model is ideal for remote expeditions where power sources are limited.
Each case is TSA‑approved, which simplifies airport screening and reduces stress during security checks.
Step 3: Pack Insulin, Supplies, and Ice Packs Efficiently
Begin by placing the frozen packs at the bottom of the cooler. Arrange insulin pens or vials in the dedicated elastic loops or compartments to prevent movement. The ALLCAMP case includes a foldable cushioned holder for syringes, while the AUVON case provides three separate compartments for pens, needles, and ancillary supplies.
Do not overfill the cooler; leave a thin air gap to allow cold air to circulate. If the cooler includes a padded buffer zone (as in the ALLCAMP model), use it to protect fragile vials from impact.
Seal the cooler with the dual zipper, then place the entire unit inside a larger travel bag. This secondary layer adds camouflage and protects the cooler from accidental opening.
Step 4: Monitor Temperature During the Trip
While the insulated cases are designed to maintain temperature, real‑time monitoring provides peace of mind. A small Bluetooth temperature sensor can be placed alongside the insulin. If the sensor indicates a temperature drift, adjust by adding an extra frozen pack or activating a USB‑powered cooling lid if available.
The 4ALLFAMILY Explorer Insulin Cooler Case offers an optional USB‑powered thermoelectric cooling lid that can lower temperature below freezing when connected to a power bank. This feature is valuable for hot climates or extended layovers where ambient temperatures exceed 30 °C.
Remember that the USB system requires continuous power (5 V/2 A). A 10,000 mAh power bank typically supplies five to six hours of active cooling, after which the frozen Biogel pack continues to provide passive cooling.
Step 5: Manage Travel Logistics and TSA Screening
Before departure, obtain a letter from a healthcare provider stating the medical necessity of the insulin and the cooler. Keep the letter and the cooler's medical tag (included with the 4ALLFAMILY model) readily accessible for security personnel.
During security screening, present the cooler and any frozen packs for inspection. All recommended products are TSA‑approved, meaning the ice packs may be shown as frozen without being discarded. If asked, demonstrate that the cooler is a sealed medical device.
When traveling by car or train, keep the cooler out of direct sunlight and store it in a climate‑controlled compartment. For long road trips, consider rotating frozen packs every 8‑12 hours to maintain a consistent temperature gradient.
Tips & Pro Tips
- Label each ice pack with the freeze date to track freshness.
- Carry a backup cooler or an additional set of ice packs in case of unexpected delays.
- Use a small insulated sleeve inside the cooler for extra protection against accidental freezing.
- Check the cooler's seal before each trip; a compromised zipper can lead to rapid temperature loss.
- For extreme heat, combine passive ice‑pack cooling with the USB‑powered lid from the 4ALLFAMILY Explorer case.
Troubleshooting
| Problem | Possible Cause | Solution |
|---|---|---|
| Insulin feels warm after several hours | Ice packs not fully frozen or depleted | Refreeze packs for at least 12 hours; add an extra frozen pack if available. |
| Cooler leaks moisture | Damaged seal or cracked ice pack | Inspect zipper and replace any compromised ice pack immediately. |
| TSA delays due to ice packs | Security agent unfamiliar with medical cooler | Present medical letter and cooler's TSA‑approved label; offer to open cooler for inspection. |
Conclusion
By preparing frozen packs, selecting a suitable insulated case, packing supplies methodically, monitoring temperature, and understanding travel regulations, one can keep insulin cold for multiple days with minimal risk. The recommended products—ALLCAMP, AUVON, and 4ALLFAMILY cooler cases—provide a range of capacities and technologies to suit diverse travel scenarios. Implementing the steps outlined in this guide will empower individuals to manage their diabetes confidently, whether on a short business trip or an extended overseas adventure.
Products Mentioned in This Guide
Frequently Asked Questions
What temperature range should insulin be kept in during travel?
Insulin should stay between 2°C and 8°C (36°F‑46°F) to remain effective.
How many ice packs are recommended for a multi‑day insulin cold chain?
Use at least four reusable gel or frozen packs, swapping them as needed for redundancy.
Do I need a temperature monitoring device for my insulin cooler?
While optional, a monitor alerts you to temperature excursions, helping prevent loss of potency.
Can I bring my insulin cooler through TSA security?
Yes—carry a doctor’s note or prescription and declare the medication; the cooler is allowed in carry‑on.
What type of insulated case works best for keeping insulin cold?
Choose a high‑performance insulated cooler designed for medication, with a tight seal and space for ice packs.